Timesheets - View, Add and Edit My Timesheet (to access the Timesheets area, and view, add, and edit your own timesheet entries); Timesheets - View, Add and Edit All Timesheets (to view, add and edit timesheet entries for all staff members)
In Practice Manager you add timesheet entries for all activities, regardless of whether these are billable (chargeable to a client) or non-billable, for example tea breaks. Timesheet entries for billable activities are added against jobs rather than clients. Timesheet entries for non-billable and paid non-billable activities are added against activities. Timesheet entries affect your monthly and yearly efficiency reports. When you take longer than expected on a job, the relevant person in your firm can be notified so they can reassess your workload.
You can use timers to add timesheet entries. The timers effectively allow you to clock in and clock out and this determines the length of time that is added against a particular client or activity. See Use timesheet timers.
There are a number of methods to access the timesheet entry page:
- Click My Timesheet on the top menu, next to your name.
- Click the Timesheet button
 on the Recently Viewed Jobs page.
 - Click Add Time on the Job Details page
- Click on a row in the Missing and Incomplete Timesheets widget in the dashboard.
The Weekly tab on the My Timesheet page provides a breakdown of the hours you have spent on billable, non-billable, and paid non-billable time. This shows you what percentage of your work is billable. The weekly view also includes efficiency data (Target Billable and Target Percentage) to help you track your weekly billable contributions according to the expectations set in your user profile. This data relies on the Standard Hours and Budgeted Billable Percentages set in your user account.
The following calculations apply (see example of weekly view below):
- Billable Percentage (BP)
- BP = B / T
- For example, on Wednesday 6 / 8 = 75%. This means that 75% of the total timesheet entries for the day were billable.
- Target Billable (TB)
- TB = Standard Hours for the day * Budgeted Billable Percentage
- For example, on Wednesday 8 * 80% = 6.4. This user is expected to record at least 6.4 billable hours every day.
- Target Percentage (TP)
- TP = B / TB
- For example, on Wednesday 6 / 6.4 = 94%. This user has not yet achieved their target of 6.4 hours per day, they are 6% under the target.
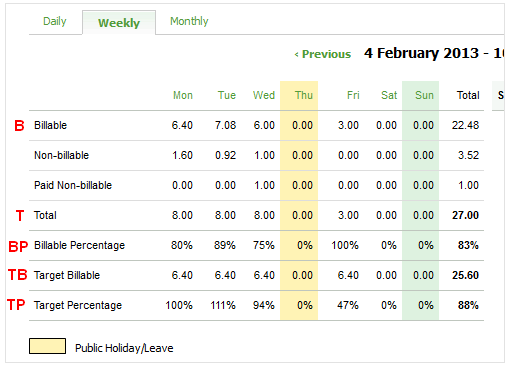
Public holidays and leave is highlight in yellow, and no efficiency data will show for these days.
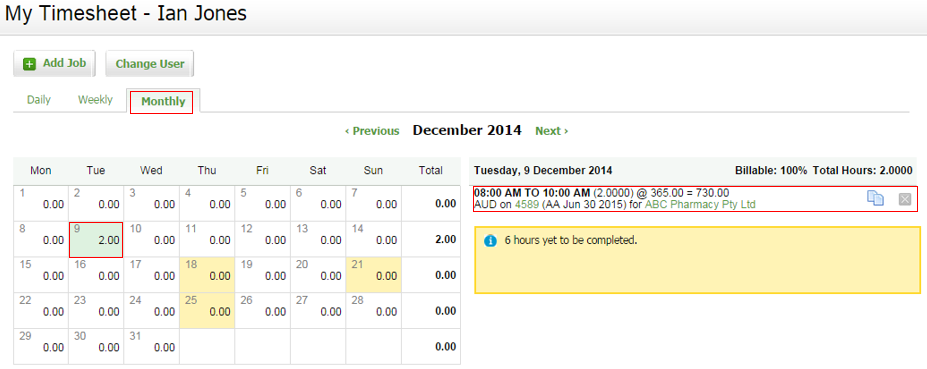
On the Monthly tab you can view all the time entered for the month. You can quickly move from one month to the next using the Previous and Next buttons. You can make adjustments to any time entered from here.
If your firm has enabled the timesheet approval feature in the general timesheet settings, you can see if your timesheet entries are awaiting approval or if they have been rejected. In the case of rejection, you can hover over the Information icon ![]() to view the rejection comment.
to view the rejection comment.
- Click on the day you want to adjust the time for.
- Click on the job on the right hand side of the screen, you will be taken back to the Daily tab.
- Edit the job details.
- Click Save.
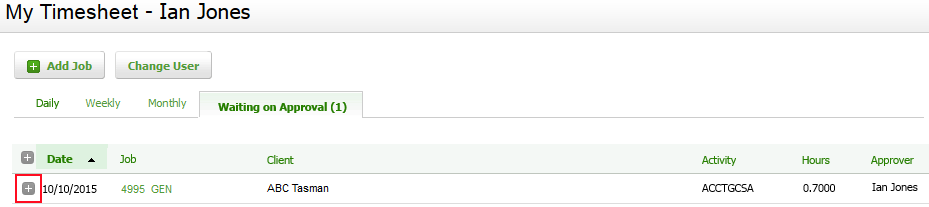
If your firm has enabled the timesheet approval feature in the general timesheet settings, on the Waiting on Approval tab you can view all the timesheets you entered that are currently waiting to be approved. If you do not see this tab it means all your timesheet entries have been approved or did not require approval.
This tab displays the number of pending entries to be approved in brackets, along with the following information:
- Date - the date you added the timesheet entry.
- Job - the Job ID, Job Type and Period End of the associated job. You can click the job link to open the job.
- Client - the name of the associated client.
- Activity - the activity code used in the timesheet entry.
- Hours - the amount of hours recorded in the timesheet entry.
- Approver - the name of the user who is responsible for approving your timesheet. This may be the Contact Partner, Contact Manager, Job Partner or Job Manager, depending on your firm’s settings.
Click a row (timesheet entry) to open that timesheet.
Click the Expand button ![]() to view the comments that were added to the timesheet.
to view the comments that were added to the timesheet.
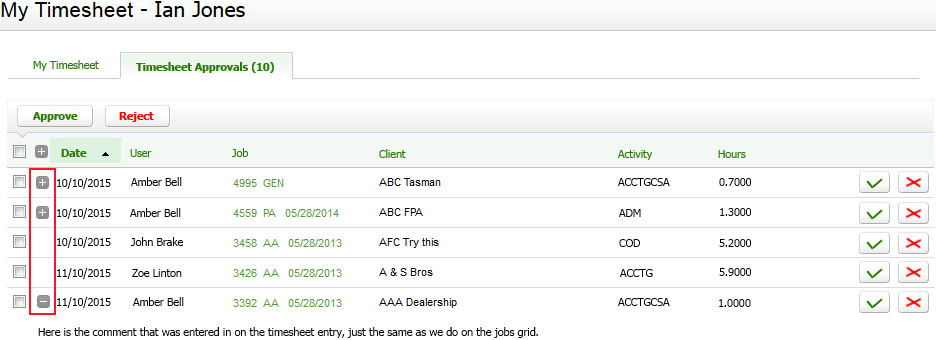
If your firm has enabled the timesheet approval feature in the general timesheet settings, you are set as an approver and have timesheet entries waiting to be approved, you can see the Awaiting Approval tab. Here you can view all the timesheets that other users have entered that are currently waiting to be approved.
This tab displays the number of pending entries to be approved in brackets, along with the following information:
- Date - the date the timesheet entry was added.
- User - the name of the user who added the timesheet entry.
- Job - the Job ID, Job Type and Period End of the associated job. You can click the job link to open the job.
- Client - the name of the associated client.
- Activity - the activity code used in the timesheet entry.
- Hours - the amount of hours recorded in the timesheet entry.
Click a row (timesheet entry) to open that timesheet.
Click the Expand button ![]() to view the comments that were added to the timesheet.
to view the comments that were added to the timesheet.
See Manage timesheet approval.
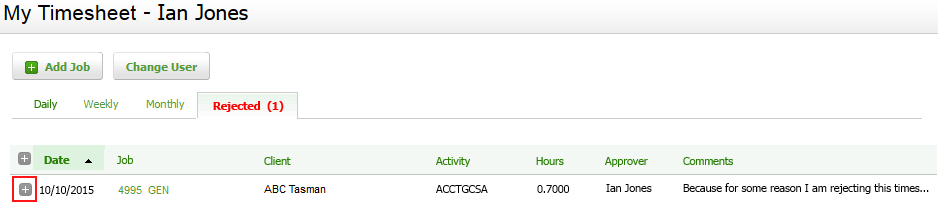
If your firm has enabled the timesheet approval feature in thegeneral timesheet settings, on the Rejected tab you can view all the timesheets you entered and were submitted for approval but were subsequently not approved. If you do not see this tab it means all your timesheet entries have been approved or did not require approval.
This tab displays the number of timesheet entries that were rejected in brackets, along with the following information:
- Date - the date you added the timesheet entry.
- Job - the Job ID, Job Type and Period End of the associated job. You can click the job link to open the job.
- Client - the name of the associated client.
- Activity - the activity code used in the timesheet entry.
- Hours - the amount of hours recorded in the timesheet entry.
- Approver - the name of the user who is responsible for approving your timesheet. This may be the Contact Partner, Contact Manager, Job Partner or Job Manager, depending on your firm’s settings.
Click a row (timesheet entry) to open that timesheet.
Click the Expand button ![]() to view the comments that were added to the timesheet.
to view the comments that were added to the timesheet.